Sunday, March 31, 2013

Last Years Easter Dress Finished Just In Time for This Year

Happy Easter!


I started this dress just over a year ago, when I was less confident with my sewing than I am now. You can see a little bit of puckering where the bodice and skirt meet. At that time I didn't even think about fitting beyond reading the measurement chart, before I started sewing. 

Right before last Easter I had her try on the almost finished dress for hemming, only to discover that she was swimming in it. Very frustrated I ended up tossing aside the dress and begrudgingly learning my lesson about fitting. The dress ended up being shuffled from location to location every time it got in my way. 

Then, the night before this Easter I was digging through my crafting supplies looking for fabric paint, and found it crumpled in the bottom of the bin. I decided that it was more appropriate for Easter that the South Western Pottery Dress, so I had Bella try it on. What do you know, it fit beautifully.

I spent the night hand basting, hemming, ironing and fighting a loosing battle to make the hem lay flat. I think it spent to much time crumpled. The dress also needed buttons, and of course I couldn't find the perfectly matching blue buttons that I had originally bought so I used yellow buttons that matched the overlay instead. Luckily I am not nearly as terrified of sewing buttons holes as I used to be.

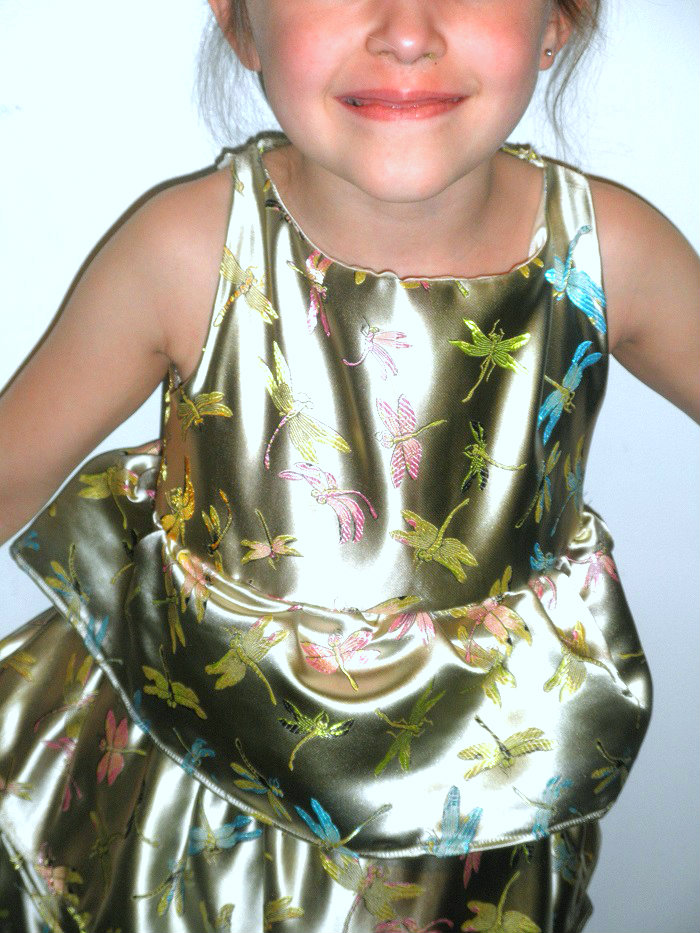
When I first started planning this dress for last Easter, I fell in love with the overlay fabric while browsing a local fabric shop and purchased the duchess satin from  Fabric.com to go with it. The Simplicity pattern was already in my stash and the contrasting buttons (not shown) were from my stash as well.

I hope your family had a great Easter. We sure had fun visiting my mother (back, left) along with my niece and nephew (who's mother is still in the hospital, but doing better.)

Saturday, March 30, 2013

What Inspires You?

What inspires you? Where do you find inspiration for writing, crafting, and self improvement projects?

For me the most obvious answer is Pinterest. I love that site, but it's not the only place I find inspiration.

My children are getting older and starting to develop their own style. Many of my projects are inspired by looking at the things they love.

I am also a sucker for a good challenge. The Project Run and Play challenges and others like it, are to a seamstress what writing prompts are to a writer. In fact this post was inspired by a ProBlogger group writing project.

Where does your inspiration come from?

Friday, March 29, 2013

Fab Finds Friday - Week 13

Today is week 13 of Friday Finds and my first time participating. 

It's always a little bit of a struggle to find inspiration when crafting for boys, but I think this project would work out great with the right color and quote. I'm thinking "Stay Hungry, Stay Foolish" by Steve Jobs on a blue t'shirt.


I love this DIY photo background. Maybe I can bring a bit of spring inside for my photo's since we sure aren't getting any of it outside.


Theses little chocolate eggs happen to be my favorite candy in the world. Sadly Easter is the only time of year you can get them. You can be sure I will be finding ways to savor these sweet little treats.

Source: Jennifer on Pinterest


All the fun of paper dolls but much more durable (and adorable).


Wednesday, March 27, 2013

Southwestern Pottery Inspired Dress

Update: Since I have received so many comments about this fabric I thought I would let you know that I purchased it from Fabric.com . They still have 74 yards left as of today and I am planning to purchase some more myself.

I finally did it! I made my self cut into one of my favorite pieces of fabric. Do you ever do that? Love a fabric so much that your afraid to use it. Luckily an event so big came along that I was able to face my fears and go ahead and cut. This week is the first week of the Project Run and Play sew along linky.

I searched through a bazillion (btw, bazillion is not actually a real number) photo's of famous paintings and loved so many of them, but I got zero (zero is a number in math but in philosophy it is the opposite of infinity and not a number) idea's for a wearable item.

So then I played with the idea of statues. A few things started to take shape in my mind, but I needed some color. Finally I looked at pottery, and there it was my inspiration. The pottery of the Southwest.

Here are a few of my favorite inspiration pieces. 

The fabric is a lightweight cotton sateen with just a tiny bit of stretch to it. I used my ugly vintage pattern as a starting point for the bodice and then lengthened it a few inches and made the neckline just a tiny bit lower. The skirt is self drafted. I left an inch of seam allowance on the top of the skirt and the bottom of the bodice.

To create the elastic casing I began by sewing the skirt and bodice with wrong sides together like you would with a french seam and then I flipped the fabric so that right sides were together and sewed about 3/4 of an inch away from the first seam. Before inserting the elastic I sewed the casing down so it laid flat against the inside of the dress.


My Bella was the lucky recipient of the dress. She can't wait for the snow to go away and the sun to come out so she can wear it some more. I really love the way this dress came out. I am thinking about making another one with pockets. They will make great summer dresses. So are you sewing along this season?
 photo blogbutton_zpsb1fa0f6d.jpg 150x200

Friday, March 22, 2013

Mixed Fabric Raglan T-Shirt Tutorial

Mixed Fabric Raglan Tee Tutorial lachmancollection.blogspot.com

Q: What do you sew for a girl who considers herself a tomboy but still loves the color pink (in moderation) and loves the feel of soft fabrics on her skin? 
A: A mixed fabric Raglan Tee

Do you want to make one for yourself? No problem. Just follow the steps below.

You will need:
  • Rib Knit Fabric - You can use any type of knit for the main fabric, but you need rib knit for the collar. The fabric I used is currently out of stock but here is something similar.  Cotton Baby Rib Knit Pale Blue I used about a half a yard with some left over.
  • Sleeve fabric - I used a satin fabric with just a tiny bit of stretch for comfort. Again, out of stock but here it is in a darker color. Tahari Stretch Satin Dark Pink You only need about a quarter yard of this
  • Thread to match your main fabric
  • Paper for Tracing
  • Hem Gauge
  • A T shirt or tank top that fits well
  • Straight edge with a square corner (a sheet of paper will work)
Step 1: Trace your T- shirt or tank top. We will be drawing a new sleeve later so don't worry about that. I chose to use the back collar for a tighter neckline. If you want a lower neckline you can fold the back neckline under and trace the neckline from the front of the tee. Remember we will be adding 3/4 of an inch with the neck binding.
Traceing T-shirt  lachmancollection.blogspot.com

Step 2: Add a 1 inch seam allowance to the bottom for the hem and a quarter inch to the side seam and collar. You don't need to add anything to the shoulder  but I did for a slightly looser sleeve because the fabric did not have much stretch. The easiest way to add the seam allowance is with a hem gauge. 
Adding seam allowance lachmancollection.blogspot.com

Step 3: Make the Sleeve. If objects in your house mysteriously disappear and you can't find your ruler grab a piece of paper. Draw a straight line from the point of the armpit to 1 inch from the edge of the collar. Then use the corner of the paper to help draw the rest of the sleeve. 
add sleeves lachmancollection.blogspot.com

Step 4: Cut out your pattern. Don't forget to add the seam allowance. Align a piece of paper behind your pattern piece with a quarter inch hanging over the edge. Then, tape in place and trim.
cut pattern lachmancollection.blogspot.com

Step 5:  Cut two of your main fabric and two of your sleeve fabric. Then, cut one long strip of your rib knit 1 and a half inches wide and as long as you can make it. We will trim it later.
Cut Fabric lachmancollection.blogspot.com

Step 6:  Pin your sleeve edges to one piece of main fabric and baste. (I know that your eyes just glossed right over the basting part, but if you are using a slippery fabric please don't skip it.)
Pin Sleeves lachmancollection.blogspot.com

Step 7: Attach the the back of the shirt to one of the sleeves but not both so it will open up like this. Sew up your seams using your favorite knit sewing method. Press your seams to the main fabric. Remember to set your iron to the setting for the most delicate of the two fabrics. Then flip your shirt and press again. You can also top stitch 1/8 inch from the seam on the main fabric.
Pinning raglan sleeves lachmancollection.blogspot.com

Step 8: Now grab that long strip of fabric you cut earlier and fold it in half lengthwise. Press. Line the raw edges up to the raw edges of the neckline on the right side. Now this is the tricky part. In order for the neck binding to maintain the correct shape you have to stretch the binding just a little bit while sewing without stretching the neckline on the shirt. Just take your time and adjust as you go. Trim off the extra.
Sew Neck binding lachmancollection.blogspot.com


Step 9: Pin, Baste and Sew your last sleeve edge to the main fabric. Sew all the way to the top including the neck binding with right sides together. 
Final Sleeve  lachmancollection.blogspot.com

Step 10: Hem the sleeve edges (I used a narrow hem) and the bottom of the shirt.
Hem Sleeves and bottom lachmancollection.blogspot.com

Step 10: Sew up your side seams. ( No picture, but its just two straight seems) and try on your shirt!
Mixed Fabric Raglan Tee Tutorial lachmancollection.blogspot.com


 photo blogbutton_zpsb1fa0f6d.jpg
Pin It Tuesday

Sunday, March 17, 2013

Some Sketching and Waiting

Almost all of my sewing time has been going to one big project. At least it's big for me. I would love to tell you what it is, but that would ruin the surprise. There are a few other non top secret projects that I am excited about as well, but unfortunately I am still waiting on fabric.

I've tried and tried to organize my huge fabric stash but those stupid laws of physics always get in the way. You can't fit something with a large volume (no matter how you fold it) into a tiny space. 


The most obvious solution would be to sew only from my stash until I cut it down. Yea, I'm not doing that, but I am only buying fabric when I have a plan for it. That means I am doing a lot of planning and then going crazy while I wait for the fabric to get here.

Fabric.com was having a great sale for 20% off any order over $40.00, so I sketched out my plans, picked my favorite and ordered a lot of fabric. All together the total came to $35.00 (after the sale) and I got 7 yards of fabric and a few notions. My planning also includes using up 2 yards of fabric from my stash. 

The raglan shirt below is going to for be for my daughter Ashley. Her style leans slightly in the direction of tomboy. She hates dresses and ruffles and lace, but she does love the color pink.
mixed fabric raglan tee

Update: See the finished mixed fabric raglan t shirt and a tutorial here.

Next up is a project for my son and husband that I am very excited about. We watched Rise of the Guardians as a family and I studied Jack Frost's sweatshirt most of the time. For a cartoon it shows incredible details. You can even see the seam lines. 
Jack Frost Hoodie
Add caption

And finally my ugly vintage pattern remixes. I am planning to get two spring dresses out of this pattern. It is the first on the list to be completed and I will give you all of the details when it's done but here is a peek at what's to come. 
My plans for the Ugly vintage Pattern
Update : The first dress is done. See it Here
Thanks so much for looking. Feel free to share your sewing to do list in the comments.

Wednesday, March 13, 2013

My Ugly Vintage Pattern

Update You Can See My Plans For This Pattern Here
If you haven't heard yet (maybe you've been living under a rock) there is an ugly vintage pattern party going on over at Simple Simon. It seems to have taken the blogging world by storm. Almost every blog I click on seems to be proudly displaying the worst of the worst from their pattern collection on there home page. I don't know what it is about these patterns or why we get so attached to them, but it's good to know that I am not the only one. So for your viewing pleasure here is the ugliest pattern in my collection.

Two things scare me about this pattern.

  1. It is from the 90's and it's vintage! OMG, when did the 90's become vintage. I feel so old.
  2. Had my mother sewn me up something like that sweet little flowery number in the 90's I would have been head over heels with it. It probably would have been my favorite outfit and I would have tried to wear it every day.
That's some scary stuff there. Now, to participate in the challenge all you have to do is show off a photo of your pattern in the linky. You don't actually have to sew anything. However I feel the need to make something out of this. It's like an unspoken challenge.

I have no clue what it is going to be or how I am going to make it into something my children will actually wear...willingly, but I have a few basic idea's floating around in my head. I'll update you when I have more. I hope you will be joining the ugly vintage pattern party as well!


Saturday, March 9, 2013

Could I Ask You For A Quick Favor

Do you remember a few days ago when I showed you the fairy costume that I made for my daughter's? Well the contest is open and she really needs your votes. She will be taking her first trip to New York City this September and would love to have an American girl gift card to take with her.

You can view all of the entries here. My daughters photos are number 131, 132, and 133. (132 is my favorite) 

You can vote by email or by comment.

Email: Send an email to nora.demington@gmail.com saying I would like to vote for #(fill in entry number here)
Comment: Write a comment on THIS blog post saying which number photo you would like to vote for

You can vote for more than one photo. Thank You so much to everyone. My daughter and I appreciate it. 
Please vote for Ashley's pictures (#131,132,133) at http://thedollwardrobe.blogspot.com/2013/03/month-of-voting-starts-now-2013-grand.html

Friday, March 8, 2013

A Scoop Back With A Button Up Bow

This blog has been so great for getting me involved. First I got to participate in the Envelope Clutch Sew Along over at See Kate Sew, and now a sewing challenge. I made this dress for the Pattern Remix Challenge that is going on at Project Run and Play.
Scoop Back Dress With Button Bow Back
The original pattern is for the Spring Fever Dress from Melly Sews. It was such a great pattern to begin with so I only made a few changes. I wanted a scoop back with a bow to make the dress extra special for my niece but I needed some way to open and close it. That's how it became a buttoned bow. The biggest challenge on this dress was the fabric. I have heard plenty of stories about embroidered Chinese brocade, but until now I have never attempted to sew with it. It practically falls apart when you cut it, and then it changes shape as you sew. This fabric was a nightmare, but I am determined to master it, so look for more projects with this type of fabric in the future.


I made this dress in size 5 for my niece so that she would have something special to wear when she went to visit her mother, who she misses terribly, in the hospital. It is modeled on my daughter, who actually wears a size 6, because I didn't want to bother my sister while she is sick, to ask if it was okay to post pictures of her daughter.

Please Excuse the less than stellar photo quality. I am still learning

How to make the scoop back buttoned bow version of the Spring Fever Dress

First visit this post on Melly Sews and print the pattern. Follow her tutorial (available on the same page) for sewing the skirt. Set the skirt aside and then follow the next few steps to make the buttoned bow.

These directions are for a making a bow that fits into the scoop on the size 5 Spring Fever Dress by Melly Sews. It would probably work on a size 4 as well if you just hid a little more of the ends in the seam allowance. 

Fist cut 2 strips of Fabric 5 in. x 3.5in. and 2 strips 10 in x 3.5 in

Cutting For Button Bow

Fold each of your smaller pieces in half long ways with right sides together and sew along the edge. Then turn your tube of fabric right sides together and press so that the seam is in the center back. Do this for both of the smaller pieces.
Now fold each tube in half with right sides together, the other way and sew the ends together. Again, turn the  it right side out and press with the seam in the center of the back.

Choose which piece you want to show when the dress is being worn and make a button hole on that side. This is not the type of garment that you would usually use a bound button hole on. I just did it because I wanted to practice the technique. Turns out it doesn't work so well through multiple layers of nightmare fabric. Feel free to use your machines button hole feature. On the other piece, sew your button. You may want to mark your fabric first so that your centers match better than mine. Can you tell that is the step I always forget?
Now take your larger strips of fabric and fold them in half with right sides together and sew the ends as shown in the picture below. Do this for both large strips of fabric.
Turn the fabric right side out and press so the seam goes down the center of the back on both pieces.
\
Fold and position the raw edges of the bow the way that you want them and then slip them into the edge of the fabric with button. Top stitch in place. Do the same for the other bow side in the fabric with the button hole.


Now you have a finished button up bow. If you are planning to add it to a scoop back dress sew the back of the dress main fabric to lining with right sides together leaving an opening on each side of the scoop for the bow edges. Press your seam allowance under. Then slide the unfinished edges of the bow into the opening and top stitch around the entire scoop back. If you are planning to use this bow for a different project, you may need to press under the seam allowance and slip stitch the raw edges of the bow closed.


You could also change up the size a bit and make this into a belt or use it to close a handbag. The possibilities are endless. Have fun and don't forget to check out all of the other creations at Project Run and Play.

Tuesday, March 5, 2013

Making Doll Clothes From Children's Clothes Patterns And Turorials

Sewing doll clothes has been a hobby of mine ever since my daughter got her first American Girl Doll for Christmas. I just couldn't justify paying for the clothes on the website. They are overpriced for the quality and fabrics that they use. (Tip: If you don't sew check etsy for some reasonably priced handmade doll clothes that are better quality than the official American Girl doll clothes.) But once you start making your own it really is addicting. The doll develops her own personality and you can tailor her wardrobe to fit it.

There are plenty of patterns available on the market for doll clothing. One source is Liberty Jane. While they offer a huge selection, sometimes they don't have exactly what I am envisioning. Besides when you want to make a matching outfit for a girl and doll it is much easier to start with a bigger pattern and downsize it than it is to start with a doll pattern and adjust it to your child's size.

For those reasons I have been working on making doll clothes from children's patterns and tutorials. I just finished up this fairy costume for a photo contest. It was made using a tutorial for a toddler romper and fairy skirt.
Fairy costume for 18 inch doll like American Girl
I started by using this tutorial from the Little Pink Monster blog. I made the following changes to fit our doll.

  • I used a 9 inch by 16 inch rectangle of knit fabric with a 40% stretch. Because I used fabric instead of a t-shirt I had to hem the bottom myself just before sewing up the back seam.
  • I sewed 7 lines 1/2 inch apart with elastic thread to create the smocking. 
  • I didn't notice any additional shrinking after the first time I sprayed it and went over it with an iron. If your trying to save time, once may be enough.
  • For the straps I sewed a 1 inch wide tube of fabric and turned it, then I hand sewed them in place while the outfit was on the doll to be sure they were placed properly. I matched the stitching to the smocking lines in the back and covered the stitching with flowers from my stash in the front.
  • For the skirt I cut a 16 by 7 inch rectangle and then created an elastic casing and inserted an 11 1/4 inch strip of elastic. I did not permanently attach it, so that it could be used with other doll clothes.
  • I cut the petals very carefully while the doll was wearing the skirt.
I'll tell you a little more about this photo contest (and beg for votes) a little later. I also plan on showing you how to adjust a pdf printed pattern to fit an 18 inch American Girl Doll. So what do you think of our finished work?
 photo blogbutton_zpsb1fa0f6d.jpg

Saturday, March 2, 2013

Basic Sewing Skills Revisited

I've spent most of this week revisiting the basics. Apparently I have forgotten a few things.


I started off by making this envelope clutch for the See Kate Sew February Clutch along. The fabric I had originally planned to use won't be here until Monday, so I made this one out of scrap as a practice run, but it actually turned out to be a pretty nice evening bag. The button is not exactly centered so I'll have to remember mark it on the next one I make. There is also some issues with the lining. 


The lesson I learned is that I have gotten just a little bit cocky with my basic sewing skills. When my other fabric arrives  I will have to take my time and not skip any steps. Still it is a nice bag. Now all I have to do is get my husband to take me out on a date so I can actually use it.

Also this week my daughter, age 9 finished her second sewing project. She made some pillows for her dolls using a tutorial from With Glittering Eyes. We are going to make the whole bed eventually. 

I had a little trouble explaining the slip stitch to her, but in the end she figured it out. We will have two more pillows to practice on for this project.

So what basic sewing skills do you use the most? How about the least?

Related Posts Plugin for WordPress, Blogger...