Showing posts with label no pattern needed. Show all posts

Monday, April 22, 2013

KCW Day One: Jack Frost Hoodie Progress


The kids and I got a chance to watch the new movie Rise of the Guardians a while back, and I have been obsessed with Jack Frost's Hoodie ever since. You can see here where I first sketched out a plan for it. 

I've made a few changes to the plan since then. Mainly, I am drafting a pattern rather than buying one, in an attempt to save both time and money. We'll see if that works out.

I traced a long sleeve t-shirt for the body and arm pieces, and the hood off a zip up hoodie. I just kind of winged the pouch pocket. Its basically a rectangle with a curve thrown in. Not to hard to draft. 


I also added the "prince seams" that make the hoodie so special. I just think it's so amazing that cartoon art has come so far that you can actually see the seams in the clothing!


I finished cutting out the pattern and fabric, except the wrist bands, which I will add at the end.


And finally I got around to sewing. This is where I am at. I still need to make some changes to the neckline, and I am sure that sewing that pocket on is going to be interesting, now that I already sewed up the side seams. I told myself, at least a dozen times, not to forget that, and what do I do? I forget!


Can't wait to pick up again tomorrow.

Thursday, April 4, 2013

A Sweater Refashion and a Sewing Milestone


Maybe it is more of a mom milestone than a sewing milestone, but when I gave her this sweater she hugged me. Doesn't seem like a big deal to you, then you must not have a daughter stuck in the awkward years right before the teens. They don't hug, they just scowl mostly.

She loves this sweater so much that she wears it everywhere. She refuses to take it off, much like the winter boots that she insists on wearing in the spring.

So why is this a milestone? It means that I am learning enough about my daughter to make her clothes that she loves. I have said it before, and I will say it again.

You can learn so much about your kids just by studying the clothes they like. It's a window into their personality.

Now back to the sweater. I started with a my own favorite sweater that had become an unfortunate victim of my bad laundry habits. (I just dump the hamper into the washer without looking)  It shrunk to the point where the stretch marks on my belly where exposed for all the world to see, but I couldn't bare to part with it.


After reading this tutorial from Girl Inspired I decided that this sweater still had a few years of being loved left in it. For the most part I followed the instructions with just a few adjustments for my daughters style preferences  She doesn't do ruffles or flowers.

I didn't make any changes to the hood because it had always been a little small on me. I also left the mini sleeve pocket in tact because it's awesome.


The sweater originally had raglan sleeves and I was bored with making them after the Mixed Fabric Raglan Tee so I changed them up. In retrospect, I probably should have stayed with the original design. Other than that I love the cardigan. Ashley loves the cardigan (and me). So the whole project is a success. 

Now all that is left to do is get her to stay still long enough to get pictures!


 photo blogbutton_zpsb1fa0f6d.jpg

Friday, March 22, 2013

Mixed Fabric Raglan T-Shirt Tutorial

Mixed Fabric Raglan Tee Tutorial lachmancollection.blogspot.com

Q: What do you sew for a girl who considers herself a tomboy but still loves the color pink (in moderation) and loves the feel of soft fabrics on her skin? 
A: A mixed fabric Raglan Tee

Do you want to make one for yourself? No problem. Just follow the steps below.

You will need:
  • Rib Knit Fabric - You can use any type of knit for the main fabric, but you need rib knit for the collar. The fabric I used is currently out of stock but here is something similar.  Cotton Baby Rib Knit Pale Blue I used about a half a yard with some left over.
  • Sleeve fabric - I used a satin fabric with just a tiny bit of stretch for comfort. Again, out of stock but here it is in a darker color. Tahari Stretch Satin Dark Pink You only need about a quarter yard of this
  • Thread to match your main fabric
  • Paper for Tracing
  • Hem Gauge
  • A T shirt or tank top that fits well
  • Straight edge with a square corner (a sheet of paper will work)
Step 1: Trace your T- shirt or tank top. We will be drawing a new sleeve later so don't worry about that. I chose to use the back collar for a tighter neckline. If you want a lower neckline you can fold the back neckline under and trace the neckline from the front of the tee. Remember we will be adding 3/4 of an inch with the neck binding.
Traceing T-shirt  lachmancollection.blogspot.com

Step 2: Add a 1 inch seam allowance to the bottom for the hem and a quarter inch to the side seam and collar. You don't need to add anything to the shoulder  but I did for a slightly looser sleeve because the fabric did not have much stretch. The easiest way to add the seam allowance is with a hem gauge. 
Adding seam allowance lachmancollection.blogspot.com

Step 3: Make the Sleeve. If objects in your house mysteriously disappear and you can't find your ruler grab a piece of paper. Draw a straight line from the point of the armpit to 1 inch from the edge of the collar. Then use the corner of the paper to help draw the rest of the sleeve. 
add sleeves lachmancollection.blogspot.com

Step 4: Cut out your pattern. Don't forget to add the seam allowance. Align a piece of paper behind your pattern piece with a quarter inch hanging over the edge. Then, tape in place and trim.
cut pattern lachmancollection.blogspot.com

Step 5:  Cut two of your main fabric and two of your sleeve fabric. Then, cut one long strip of your rib knit 1 and a half inches wide and as long as you can make it. We will trim it later.
Cut Fabric lachmancollection.blogspot.com

Step 6:  Pin your sleeve edges to one piece of main fabric and baste. (I know that your eyes just glossed right over the basting part, but if you are using a slippery fabric please don't skip it.)
Pin Sleeves lachmancollection.blogspot.com

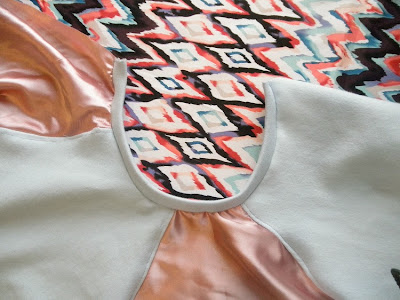
Step 7: Attach the the back of the shirt to one of the sleeves but not both so it will open up like this. Sew up your seams using your favorite knit sewing method. Press your seams to the main fabric. Remember to set your iron to the setting for the most delicate of the two fabrics. Then flip your shirt and press again. You can also top stitch 1/8 inch from the seam on the main fabric.
Pinning raglan sleeves lachmancollection.blogspot.com

Step 8: Now grab that long strip of fabric you cut earlier and fold it in half lengthwise. Press. Line the raw edges up to the raw edges of the neckline on the right side. Now this is the tricky part. In order for the neck binding to maintain the correct shape you have to stretch the binding just a little bit while sewing without stretching the neckline on the shirt. Just take your time and adjust as you go. Trim off the extra.
Sew Neck binding lachmancollection.blogspot.com


Step 9: Pin, Baste and Sew your last sleeve edge to the main fabric. Sew all the way to the top including the neck binding with right sides together. 
Final Sleeve  lachmancollection.blogspot.com

Step 10: Hem the sleeve edges (I used a narrow hem) and the bottom of the shirt.
Hem Sleeves and bottom lachmancollection.blogspot.com

Step 10: Sew up your side seams. ( No picture, but its just two straight seems) and try on your shirt!
Mixed Fabric Raglan Tee Tutorial lachmancollection.blogspot.com


 photo blogbutton_zpsb1fa0f6d.jpg
Pin It Tuesday
Related Posts Plugin for WordPress, Blogger...