Showing posts with label shirring. Show all posts

Monday, May 6, 2013

Make It or Buy It - Bonpoint Tank Top and Shorts

For the second week of Make it or buy it, I've found another expensive children's boutique item.  I'm starting to see a trend here. I have no idea how I ended up with such expensive tastes, especially since I've never actually purchased any expensive children's clothing.

I couldn't help but fall in love with this adorable little summer outfit from Bonpoint. Sadly, the price is likely to bring tears to your eyes, and for play clothes! $165 for the shirt alone. No way.

So I studied the images on the stores site for a little while and I think I have come up with the simplest way to recreate the look. I haven't actually sewn it yet, because I can barely keep up with my current to do list, but when I do I will post a full tutorial.

In the meantime if you would like to do it yourself here is what I recommend.

Tank Top:
Fabric and Notions

Kaufman Cambridge Cotton Lawn Red - $7.95

Embroidery Floss in Shades of Green $2.00

Elastic Thread $3.00

3 matching buttons

Pattern - Not needed

  • The top is made of two rectangles, each twice the width of a good fitting non stretch shirt and an inch or two longer for hemming. 
  • The top area is shirred with elastic thread and then embroidered in a simple zig zag pattern using three different shades of green. It can be done by machine or by hand. 
  • Once that is done sew up the side seams and make two tubes of fabric for the the spaghetti straps. 
  • After the shiring is secured by the embroidery or top stitching sew two straight lines down the shirred portion of the back for additional securing then cut right between them.
  • Hem the edges and attach buttons to onside and make button holes on the other. Another option is hook and eyes.


Shorts

I plan to make the shorts out of cutoff jeans, and use the the left over denim to make the flaps for faux welt pockets.

Skill Level: Advanced Beginner

Most of this is incredibly easy but working with elastic thread may seem a bit scary to a beginner until they try it. If the embroidery makes you nervous just top stitch in a zig zag pattern with a thick thread. Or use regular thread and go over it a few times.

The Verdict
Let me think about this. Pay over $165 + international shipping or pay $10 and spend a few hours on my favorite hobby, sewing. It's a tough call but I think I'll go with Make It.

Please let me know if you make this look so that I can link to it, and I promise to post a full tutorial once I catch up on my other sewing projects.

Tuesday, March 5, 2013

Making Doll Clothes From Children's Clothes Patterns And Turorials

Sewing doll clothes has been a hobby of mine ever since my daughter got her first American Girl Doll for Christmas. I just couldn't justify paying for the clothes on the website. They are overpriced for the quality and fabrics that they use. (Tip: If you don't sew check etsy for some reasonably priced handmade doll clothes that are better quality than the official American Girl doll clothes.) But once you start making your own it really is addicting. The doll develops her own personality and you can tailor her wardrobe to fit it.

There are plenty of patterns available on the market for doll clothing. One source is Liberty Jane. While they offer a huge selection, sometimes they don't have exactly what I am envisioning. Besides when you want to make a matching outfit for a girl and doll it is much easier to start with a bigger pattern and downsize it than it is to start with a doll pattern and adjust it to your child's size.

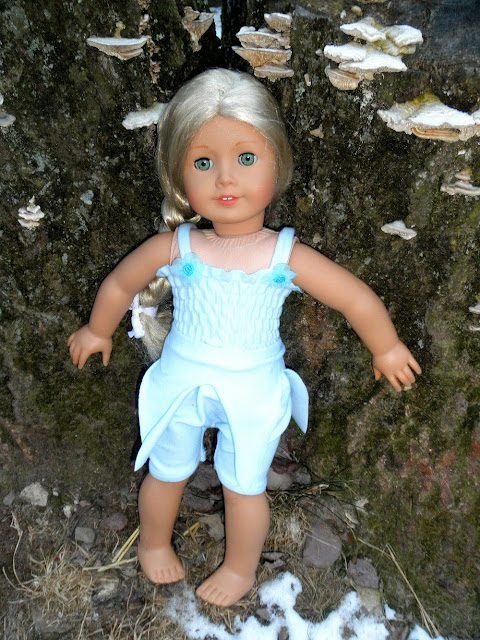
For those reasons I have been working on making doll clothes from children's patterns and tutorials. I just finished up this fairy costume for a photo contest. It was made using a tutorial for a toddler romper and fairy skirt.
Fairy costume for 18 inch doll like American Girl
I started by using this tutorial from the Little Pink Monster blog. I made the following changes to fit our doll.

  • I used a 9 inch by 16 inch rectangle of knit fabric with a 40% stretch. Because I used fabric instead of a t-shirt I had to hem the bottom myself just before sewing up the back seam.
  • I sewed 7 lines 1/2 inch apart with elastic thread to create the smocking. 
  • I didn't notice any additional shrinking after the first time I sprayed it and went over it with an iron. If your trying to save time, once may be enough.
  • For the straps I sewed a 1 inch wide tube of fabric and turned it, then I hand sewed them in place while the outfit was on the doll to be sure they were placed properly. I matched the stitching to the smocking lines in the back and covered the stitching with flowers from my stash in the front.
  • For the skirt I cut a 16 by 7 inch rectangle and then created an elastic casing and inserted an 11 1/4 inch strip of elastic. I did not permanently attach it, so that it could be used with other doll clothes.
  • I cut the petals very carefully while the doll was wearing the skirt.
I'll tell you a little more about this photo contest (and beg for votes) a little later. I also plan on showing you how to adjust a pdf printed pattern to fit an 18 inch American Girl Doll. So what do you think of our finished work?
 photo blogbutton_zpsb1fa0f6d.jpg
Related Posts Plugin for WordPress, Blogger...